About Profiles
A Profile is a collection of attributes that is used as a template in the Orchestration Console application. By using Profiles, you can reuse the same collection of attributes in multiple places without having to redefine the attributes every time.
In the Orchestration Console, profiles can be used to represent stores, customers, and addresses. Each profile is defined by its Display Name, a set of Default Attributes and a set of Custom Attributes.
Default attributes of a profile are predefined and cannot be changed. However, you can modify their setting values.
You can add custom attributes to a Profile and you can use profiles as custom attributes for other Profiles.
The Orchestration Console features two profiles: Base and Custom . Base Profiles are supplied by default and users can create Custom Profiles.
When creating a custom profile, default attributes are always the same.
For both Base and Custom Profiles, you can add custom attributes of different types such as text, date, yes/no choices, or numbers. You can also select any shared or embedded Profile as a custom attribute.
BASE PROFILES
Base Profiles are specific default profiles which are provided with the Orchestration Console They include Address, Customer, Fulfillment Location, Organization, Payment Profile, Store and Warehouse.
| Base Profile Name | Profile Type | Address | Customer | Fulfillment Location | Organization | Payment Profile | Store | Warehouse |
|---|---|---|---|---|---|---|---|---|
|
Address |
Embedded |
X |
X |
X |
X |
|
X |
|
|
Customer |
Shared |
|
|
|
X |
|
X |
|
|
Fulfillment Location |
Shared |
|
|
|
|
|
X |
X |
|
Organization |
Shared |
|
X |
|
|
|
|
|
|
Payment Profile |
Embedded |
|
X |
|
|
X |
|
|
|
Store |
Shared |
|
X |
|
|
|
|
|
|
Warehouse |
Shared |
|
|
X |
|
|
|
|
CUSTOM PROFILES
You can create Custom Profiles to use in the Orchestration Console. You can also select whether you want them embedded or shared to use later in another custom Profile or in a base Profile.
Custom Profiles could be set up and used for customer preferences, store preferences, loyalty cards, pick & pack floor plans, etc.
For each Custom Profile, you can create different instances that will use the attributes that have been selected for the Custom Profile. Each set of attribute values represent a unique instance of the Profile. You can also filter profiles by name or base attribute value.
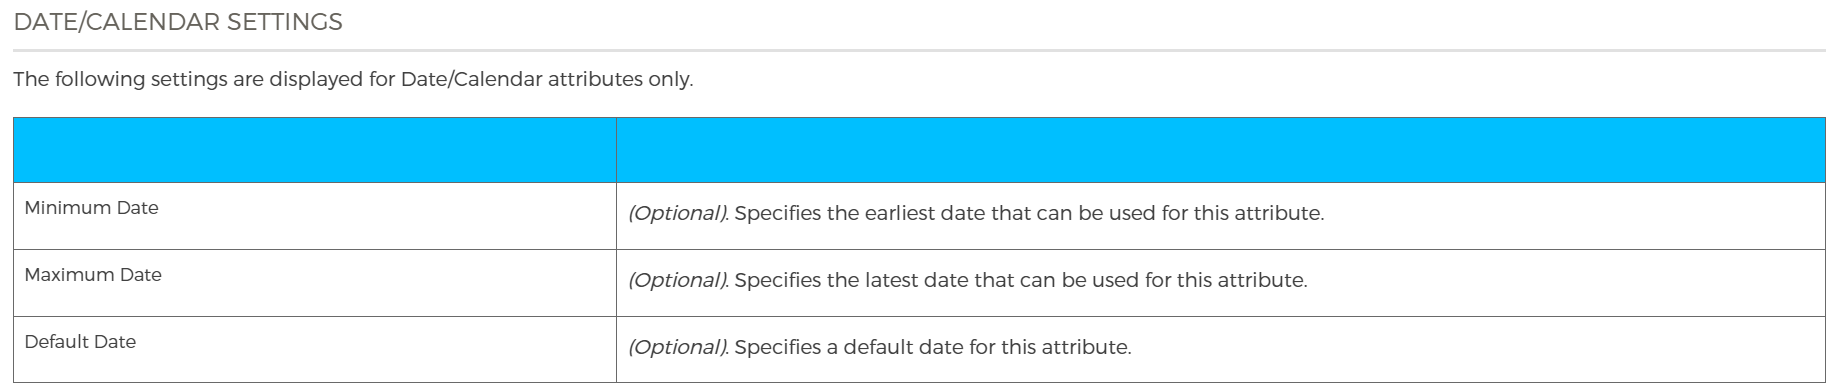
All Custom Profiles have the same set of default attributes, as seen in the Date/Calendar Settings example, below.
SHARED vs. EMBEDDED PROFILES
Shared Profiles are used when you want to link multiple Profile instances to the same Profile instance. A Profile instance is a collection of attribute values. The Shared Customer Profile could include any of the following:
| • | Stores Profile (Used to record the preferred stores of a customer) |
| • | Organizations Profile (Used to record which organization(s) the customer belongs to ) |
| • | Address Profile (Used to record addresses that are used by a customer) |
| • | Payment Profile (Used to record saved payment preferences) |
Newsletter Profile: Customers that subscribe to a newsletter can be linked to the newsletter Profile.
Shared Profiles can be used on their own or included in another Profile
Embedded Profiles are used when you want to link a Profile instance to an instance of another Profile
The Address Profile where each customer's address is unique to that customer
Embedded Profiles can only be included in another Profile. For example, an Address (Embedded) Profile in a Customer (Shared) Profile.
PROFILE SETTINGS
When you create a new Profile, you must specify the type of Profile and various settings for the type of attributes that you choose.
You must also specify whether or not the Profile can have more than one value of an look-up attribute, or more than one instance of type Profile.
A Customer Profile having multiple Address Profiles (shipping and billing) would be an example of Number of Profiles Allowed.
PROFILES WORK FLOW
Use this workflow to help you understand the sequence of steps that are required to create Profile templates, create Profile instances, and link or associate Profiles.
| 1. | Create a Profile Template by using Customer > Administration. Typically, a system administrator creates and maps the content of Profile Templates. |
| 2. | Create instances of Profiles by using Customer > Profiles. Typically, a content manager or security administrator creates content for Custom Profiles. |
| 3. | Link Profile Templates as required by using Customer > Administration. Typically, a content manager or security administrator adds associations between Profiles. |
| 4. | Link Profile Instances as required by using Customer > Accounts. Typically, a content manager or security administrator adds associations between Profiles. |
REFERENCES
| • | Viewing Profiles |
| • | Managing Profiles |
| • | Creating Profiles |