Localizing datatypes
Localization of datatypes follows the general localization rules in Experience Management. Localization of forms created with Forms Renderer has its specifics. In the following sections we will cover both types of localization in detail.
Global datatypes and page datafolders are localized in the same manner; page metatypes are localized as part of localization of pages when used on the latter.
The focus of this guide is global datatypes; that is why the following procedures will be illustrated with these datatypes.
Localizing datatypes in Experience Management implies localizing the data items these datatypes contain. If you add an item to a localized datatype, you can switch to the other language in Experience Management, translate the item and use it on its own on the localized website from now on.
The item in the main language and the item in the language you localize to will now co-exist. Hence, changes in the item in one language will not affect the item in the other language.
Before you can localize data items, you should enable localization on datatypes.
Applying Validation Rules to Fields
A validation rule is a criterion to ensure that input data.
For example, when a user enters information form field is correct.
You can apply one or more validation rules to a datatype field to control the user’s input.
For example, you want to ensure that the user:
| • | Entered an email address in a corresponding field |
| • | Entered a well-formed email address |
In this case, you can apply two validation rules to the field:
| • | Checking that the field has a value (for example, is not nul”) |
| • | Validating the string as a well-formed email address with a regular expression |
Experience Management is delivered with a predefined set of validation rules that you can apply to datatype fields, too.
All the validation rules are available as functions in Composite.Utils.Validation.
Each type of field has its own set of validation rules.
Adding Validation Rule to Field
| 1. | Edit a datatype, select a field to add a validation rule to. |
| 2. | On the Advanced tab, click Add Validation Rules. The Field Validation Rules Configuration window appears. |
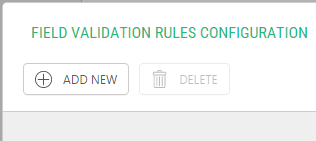
| 3. | Click Add New. The Select Function window appears. |
Note: If at least one validation rule has already been added to the field, the button will show “Edit Validation Rules”.
Note: If no validation rules have been previously added to the field, this window will pop up automatically after Step 3.
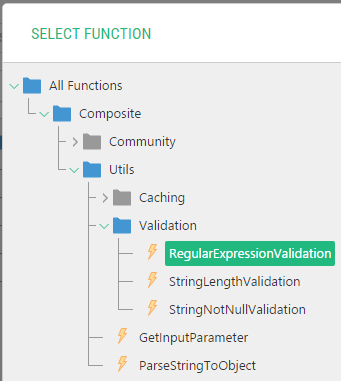
| 4. | Expand All Functions > Composite > Utils > Validation, select the validation rule you want to use on the field and click OK. |
| 5. | If the validation rule requires that its parameters should be configured, enter the required values. |
| 6. | Click OK to save changes and close the Field Validation Rules Configuration window. |
You have just added a validation rule to the field.
Note: You can only edit a validation rule that has parameters.
You have just added a validation rule to the field.
Editing Validation Rules
| 1. | Edit a datatype. On the Fields tab, select the field you want to edit. |
| 2. | On the Advanced tab, click Edit Validation Rules. |
| 3. | Select the validation rule you want to edit. |
| 4. | Click OK to save changes and close the Field Validation Rules Configuration window. |
You have just modified a validation rule for the field.
Deleting Validation Rule
| 1. | Edit a datatype. On the Fields tab, select the field you want to delete a validation rule. |
| 2. | On the Advanced tab, click Edit Validation Rules. |
| 3. | Select the validation rule you want to delete and click Delete. |
| 4. | Click OK to save changes and close the Field Validation Rules Configuration window. |
You have just deleted a validation rule from the field.
Validation Rules Overview
Except the Boolean and Data Reference types, each field type has its own set of validation rules.
The Boolean type has no validation rules. The Data Reference type reuses the String’s validation rules.
Most datatypes has one common validation rule – the one that ensures that the value is not null.
DateTime
DateTimeNotNullValidation
This rule ensures that the input value has been entered and is therefore not null.
Decimal
DecimalNotNullValidation
This rule ensures that the input value has been entered and is therefore not null.
DecimalPrecisionValidation
This rule validates the precision of digits, that is, the number of decimals the user has specified). It has one required parameter:
MaxDigits
An Int32 value that specifies the maximum number of digits allowed on the decimal.
GUID
GuidNotNullValidation
This rule ensures that the input value has been entered and is therefore not null.
Int32
Int32NotNullValidation
This rule ensures that the input value has been entered and is therefore not null.
IntegerRangeValidation
This rule validates that an integer lies within a range of values specified in its two required parameters:
min
An Int32 value that specifies the minimum number allowed in this field.
max
An Int32 value that specifies the maximum number allowed in this field.
String and Data References
StringNotNullValidation
This rule ensures that the input value has been entered and is therefore not null.
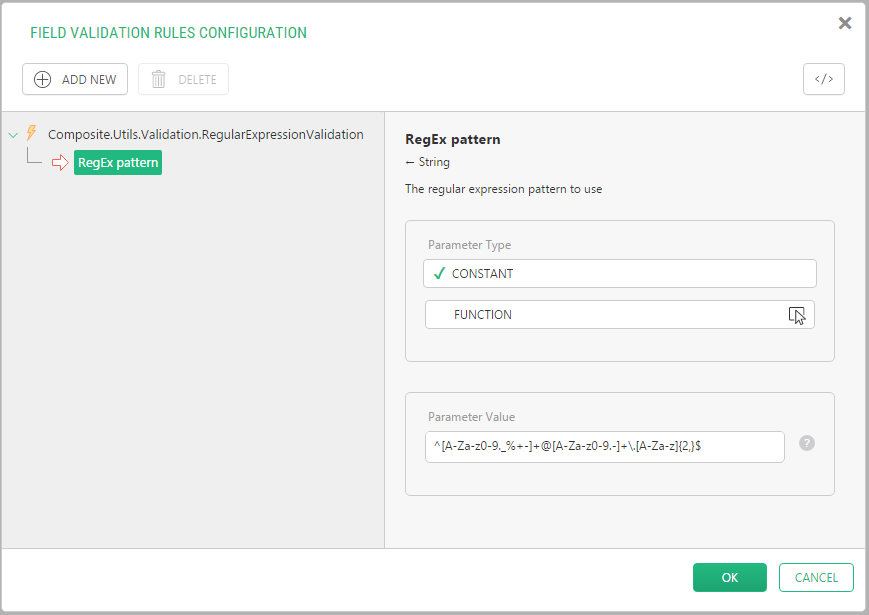
RegularExpressionValidation
This rule validates that a string conforms to the regular expression specified in its required parameter:
Pattern
A string value that holds the regular expression pattern to use.
StringLengthValidation
This rule validates that the length of a string lies within a range specified in its two required parameters:
min
An Int32 value that specifies the minimum number of characters allowed in this field.
max
An Int32 value that specifies the maximum number of characters allowed in this field.
Example of Using Validation Rules
As an example, you have a simple registration form with two fields: Name and Email Address.
You want the name the user should enter in the corresponding field to be no longer than 8 characters. You also require that the email address meets a specific format.
You use a global datatype called “Users” with the respective two string fields. The following explains the best practice to apply validation rules for each field.
First, limit the number of characters in the Name field to 8:
| 1. | Edit a datatype, and on the Fields tab select the Name field. |
| 2. | On the Advanced tab, click Add Validation Rules. The Field Validation Rules Configuration window appears. |
| 3. | Click Add New. |
| 4. | Select StringLengthValidation and click OK. |
| 5. | Expand All Functions > Composite > Utils > Validation, select the validation rule you want to use on the field and click OK. |
Note: If the Select Function window has not popped up over the Field Validation Rules Configuration window in Step 3, click Add New.
| 1. | Select the Email Address field and on the Advanced tab, click Add Validation Rules. |
| 2. | In the Select Function window expand All Functions > Composite > Utils > Validation. |
| 3. | Select RegularExpressionValidation and click OK. |
| 4. | In the Field Validation Rules Configuration window, set the RegEx pattern parameter to “^([a-zA-Z0-9_\-\.]+)@[a-z0-9-]+(\.[a-z0-9-]+)*(\.[a-z]{2,3})$” (without quotation marks) and click OK |
| 5. | Save the datatype. |
Now try to enter values in the Registration form by using the values that both meet and do not meet the requirements and see how the validation works.
Making Validation Messages on Forms User-Friendly
Note: The following information is applicable to the web forms generated by Forms Renderer.
The field validation on a form may fail because the value in the field does not meet requirements. You specify the requirements for the value when you either set properties of the field (for example, Field type or Required) or apply validation rules.
In both cases, if the validation fails, a validation error message appears on the form. By default, the Forms Renderer uses built-in system messages, which may be quite technical and not always appropriate on the form.
You can make the message user-friendly by replacing the system message with your own message. In this case, if the field validation fails, the user-friendly message will be displayed on the form instead.
When you specify the Help text for a field of a datatype, the Forms Renderer uses this text for a validation message on a form.
| 1. | Edit the datatype used by the Forms Renderer. |
| 2. | Open the Fields tab and select a field under the Datatype fields. |
| 3. | Enter a user-friendly message in the Help property. |
| 4. | Repeat Steps 2-3 for each field. |
| 5. | Save the datatype. |
To enable localization on datatypes and localize data items, at least two languages must be added to Experience Management.
By default, datatypes created in Experience Management are not localizable. Enabling localization on existing datatypes is different from enabling localization on datatypes being created.
Localizing Existing datatypes
| 1. | Select the datatype. |
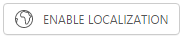
| 2. | On the toolbar, click Enable Localization. |
Enabling localization on existing datatypes:
| 3. | In the Enable Localization wizard, select the “language” (locale) you want to move existing data items to |
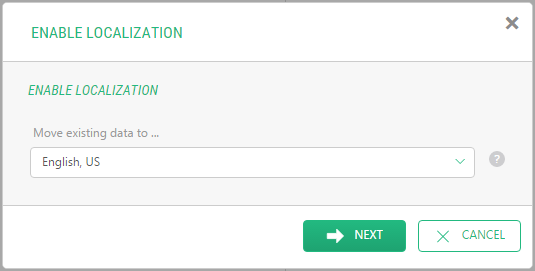
When you enable localization on a datatype, you should choose where to keep the existing data items. We recommend that you keep (“move”) the data items in the language you have created them in, which is often the default language in the system.
Click Next and then click Finish to confirm your settings.
Now the datatype has been localized, and the button on the toolbar for this datatype is replaced with the Disable Localization button.

Before you go on to localize data items, learn how you can localize a datatype you are creating.
Localizing datatypes Being Created
You can also enable localization on a datatype while creating it:
| 1. | In the Data module , select Global datatypes and click Add Datatype on the toolbar. |
| 2. | On the Settings tab, place a check mark in the Is localizable data check box. |
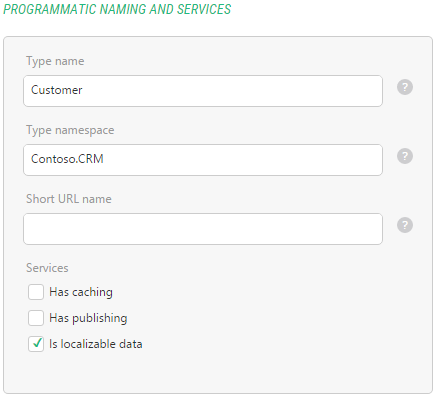
| 3. | Continue to create your datatype. |
Alternatively, you can first create your datatype and then enable localization as described in the previous procedure.
Localizing Data Items
Localization of data items is similar to localization of web pages. Before you localize an item, you should make sure that the item has the published status.
| 1. | Switch to the language you want to localize |
| 2. | Expand the datatype with the target item. |
| 3. | Select the item and click Translate on the toolbar. The item editor form opens in the working area. |
| 4. | Replace the values in the original language with those in the target language where necessary. |
| 5. | Save the item. |
| 6. | Repeat Steps 3-5 for as many items as you need. |
Troubleshooting
| • | If there is no Enable Localization on the toolbar or in the context menu of a datatype, make sure that you have at least two languages added in the system. |
| • | If the item you want to localize is grayed (disabled), make sure you have the item published in the original language. This might be the case if the datatype requires that items should be manually published. |
| • | If you have created the item in Language A, and it does not exist in Language B, make sure that the translation language is set to Language A (View, Translation, From language). In other words, to see the item created in one language, you should select the latter as the translation language when switching to another language. |