Managing Email Templates
When an event is generated by the platform, emails can be sent automatically to customers or members of your organization. To ensure these emails uses your business images, emails templates can be configured in the platform to ensure consistency in the messaging. You can manage your email templates in the Settings application. Here you can perform various actions on the default templates or ones you've created yourself.
When the email templates are active, notifications can be automatically sent when a new customer is created, when a password is changed, when a password reset is requested, when an order is created, when a Return Merchandise Authorization (RMA) is created, or when an RMA is finished. These default email templates can also be modified as required, or you can create your own email templates to meet your business requirements.
Tip: Use template variables to so that you can reuse the same data in multiple email templates.
Understanding Email Template Behaviors
Email templates can be created in the Global Scope, in a Sales Scope or a Dependent Scope. Templates belong to a specific scope and can be inherited by their child scopes so that the email template of the parent scope is used. Alternatively you can override the templates from a parent scope in the child scope to customize the content for that child scope and its children as well.
Note: When you modify a template created in a scope, the inheritance associated with the parent scope is broken, and that version of the template is effective for the current scope and its child scopes with the modification being effective for all scopes that inherit from that template
You can also deactivate a template for a specific scope.
Important: You can create email templates by adding content using the Orchestration Console. However, the email template must be bound to a trigger in the code that sends the email.
For each scope, the email template content can be modified by language-culture.
Important: Every language you write a template for, including your Default System Language, must have all the fields filled. When you do not use a language, all the fields must be left blank.
The language-culture that is used to send communications is resolved as follows:
| 1. | The preferred communication language of the customer is used by default |
| 2. | When no communication language is defined, the order language of the last customer order is used |
| 3. | When no order is defined, the default language of the system is used |
The template that is used is set as follows:
| 1. | Find the template by name for a specified scope, with inheritance. If no template is found, or if the template is inactive, do not send any email |
| 2. | Get the localized templates for the specified culture and system language |
| 3. | If the template in the specified language is not valid, use the system language. |
Viewing Email Templates
You have several options when viewing your various email templates in the Settings application in the Email Templates tab.
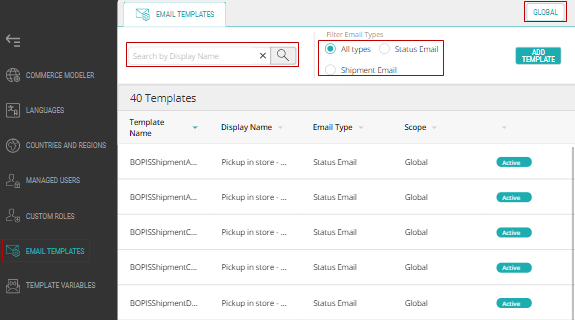
Once here, you can search for your desired template in the search bar by using its Template Name or Display Name. Additionally, you can refine your search further by the email type by clicking one of the boxes to the right of the search bar.
Important: To find a template you must make sure that you're in the proper and relevant scope in top-right corner of the page.
After finding the template you wish to view, click on it and you will be brought to a new tab that displays all of its information in greater detail.

Figure 1 - The above image shows what you will initially see when you enter the Email Templates section of the Settings Application.
Adding Email Templates
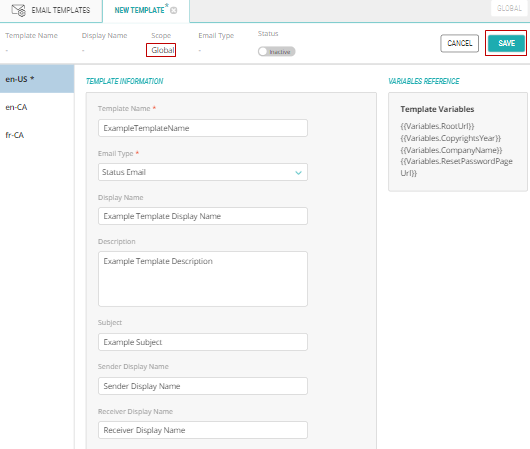
To add a new email template, first make sure you are in the correct scope. Once you've done this, click the Add Template button in the top-right of the page.

Figure 2 - The Add Template button is located on the right edge of the page
After this you'll be brought to a New Template tab where you must fill out every one of the below sections as well as the HTML and Plain Text bodies.
Note: You can fill out a version of the template for each language you support.
Click Save.

Figure 3 - These are the fields that must be filled out in addition to the HTML and Plain Text body of the email.
Important: You must set the toggle at the top of the tab to Active in order for the email template to be used by the Orckestra Commerce Cloud.
Modifying Email Templates
You can modify any email template by first selecting it and making you changes in its tab. Once done, you must remember to save your changes by clicking the Save.
The Orckestra Commerce Cloud Email Templates module uses the TinyMCE rich text editor plug-in. Using this rich text editor you can input variables you've made in the Template Variables module.
For example, the general syntax of a custom variable in the template editor is {{Variables.VariableName}}. To use other contextual variables, such as Store and Order related ones, use the format {{Store.VariableName}] and {{Order.VariableName}} respectively.
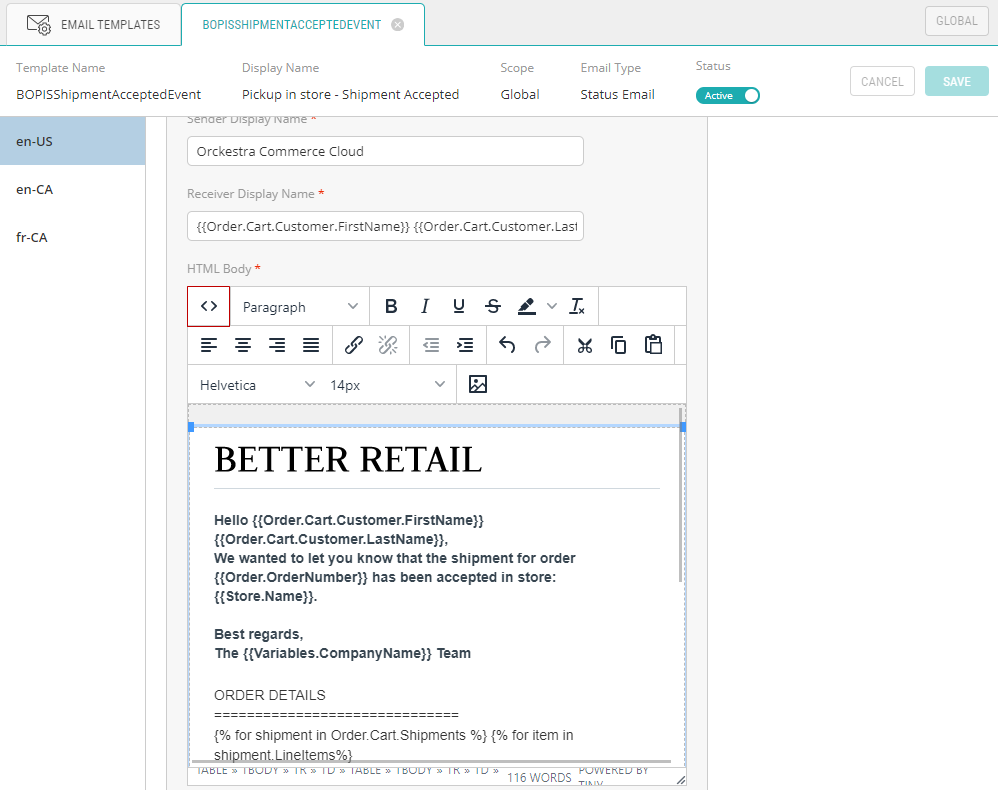
In addition to being able to see the rich text typeset version of the, you can also toggle to the HTML source code. To do this, press the <> button in the top-left of the HTML Body section.

Figure 4 - In the red box is the source code button. Additionally, you can see the various types of custom, order, and store variables.

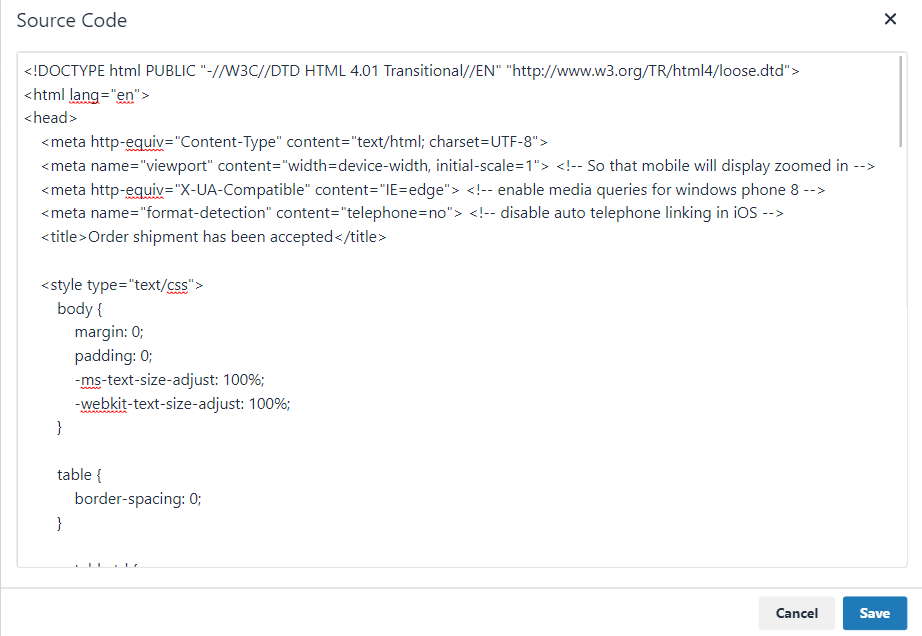
Figure 5 - An email template source code
Once you have modified the template to your needs, remember to save your changes in the top-right by clicking the Save.
Important: if you directly edit the source code of the template, you must first save in the bottom-right of the source code pop-up window before saving the whole template as described above.
Deleting Email Templates
Important: You cannot delete an email template, you can only make it inactive.
To deactivate an email template, first select it under the appropriate scope. At the top of the expanded details tab for the template you will see the activity toggle as shown below.
| • |  |
Figure 6 - The information bar for an email template
To render a template inactive click the toggle button once and it will change to Inactive. Click Save.
REFERENCES
| • | About Templates |
| • | Managing Template Variables |