Adding Price Lists
In the Orchestration Console, price lists allow to you to manage price changes for your products
Price lists are associated with a specific scope. This is particularly useful when you want to have a product with different price values depending on the scope.
Price lists are displayed in priority sequence, with the highest priority at the top, in a descending start date order. New price lists are automatically displayed at the top of the list, unless start or end dates have been specified.
Adding a price list
| 1. | Click the Price Lists tab. |
| 2. | Using the Scope Selector, select a scope as required. |
| 3. | To view existing price lists prior to creating a new one, click a filter button: |
Past - All price lists with an end date before today.
Current - All price lists with a start date before today, and an end date after today.
Future - All price lists with a start date after today.
| 4. | Click the Add New Price List button. |
The Add New Price List button is not available in Dependent scopes because price list creation is not available at this level. Product
The New Price List window is displayed.
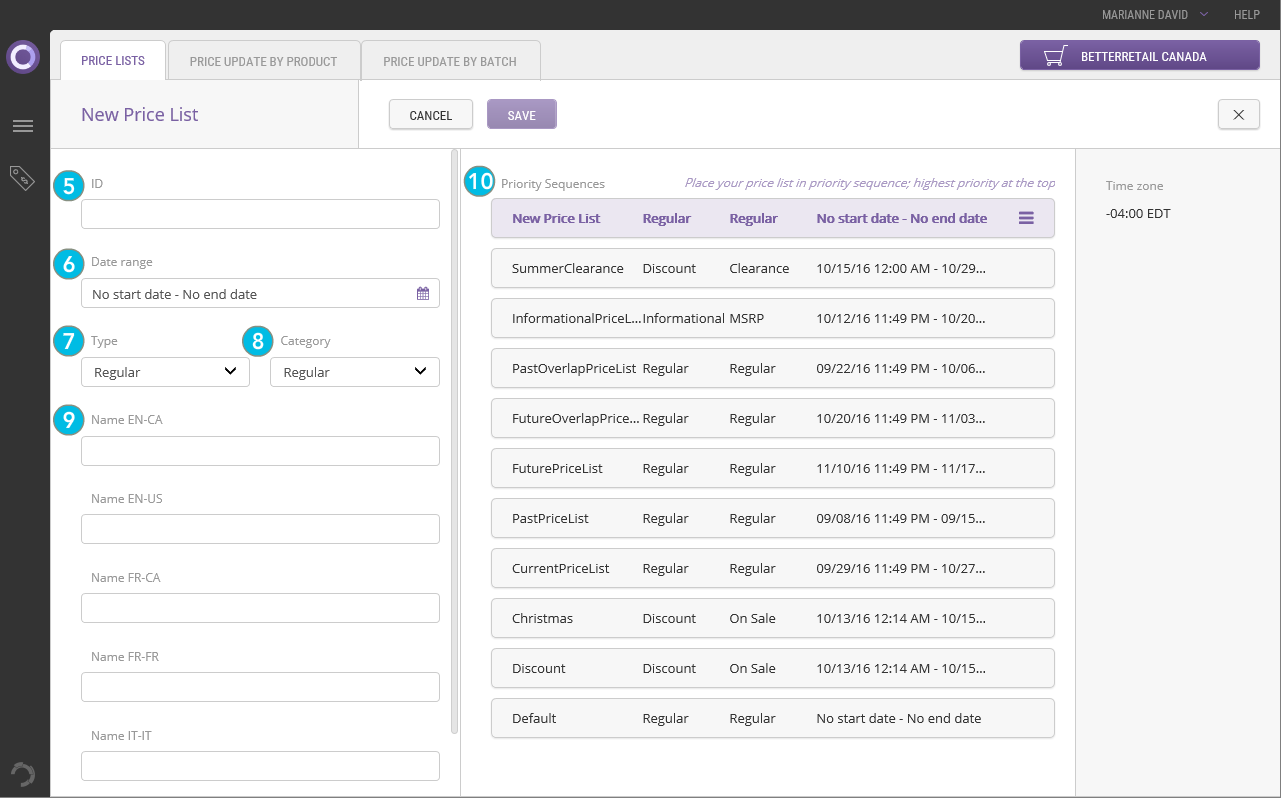
| 5. | Enter an ID for the Price List. |
This ID cannot be modified once your new price list is saved.
| 6. | OPTIONAL: Specify a Date range for your price list by clicking the Date range field to display a calendar. |
Times selected in the calendar picker are based on your current time zone. When you apply your date/time choices, the timezone are shown in the Date range box.
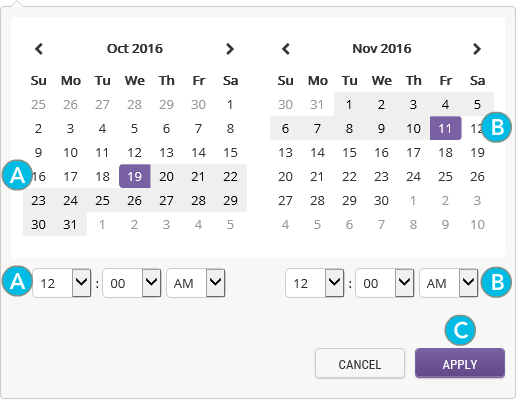
| a. | Select a Start date and time in the calendar picker. |
| b. | Select an End date and time in the calendar picker. |
| c. | Click Apply to set your Date range. |
Click Cancel in the calendar dialog box or clear the Date range field to discard your Date range settings.
| 7. | Specify a Type. Select a choice from the drop-down menu. |
| 8. | Specify a Category. |
| 9. | Enter a Name for the Price List in the Language fields as required. This name will be displayed to users of the Orchestration Console. Repeat this process for each language field that you require. |
| 10. | OPTIONAL: Specify a Priority. Changing the priority sequence is particularly useful when you create a price list that has no dates, has the same dates, or overlaps with another price list. |
In the Priority Sequences section, drag the Price List that you just created to a new position in the list.
You can only drag and drop the price list that you are currently adding. All other price lists are read-only.
| 11. | Click Save. |
REFERENCES
| • | Managing Price Lists |