Adding Locations
Store and Warehouse entities are created to represent both virtual and physical locations that are a part of your commerce landscape. These 2 entities are considered as Locations in Orckestra Commerce Cloud
| • | Stores |
| • | A store entity can be Virtual, representing a web sales channel. A virtual store is linked to a single scope and can be designated as the Order Location of an order. |
| • | A store entity can also be Physical, representing a brick-and-mortar location. A physical store is linked to a single scope and can be used as the Order Location of an order. |
| • | Warehouses |
| • | A warehouse is an entity representing a physical warehouse or distribution center. A warehouse can be linked to one or more scopes. If a brick-and-mortar store is used as a fulfillment location for other markets, it can also be modeled as a warehouse. |
Orckestra Commerce Cloud v5.0 now features a more streamlined way to create locations: the Time Zone field (previously located in the Store Hours tab), has been moved to the Attributes tab in order to increase the location creation efficiency.
In Orckestra Commerce Cloud, you can create and manage locations to reflect your business model including new stores offering fulfillment to customers. Click the Hamburger menu located at the top-left of the screen to access the Locations tab.
| 1. | Click Create Location. |
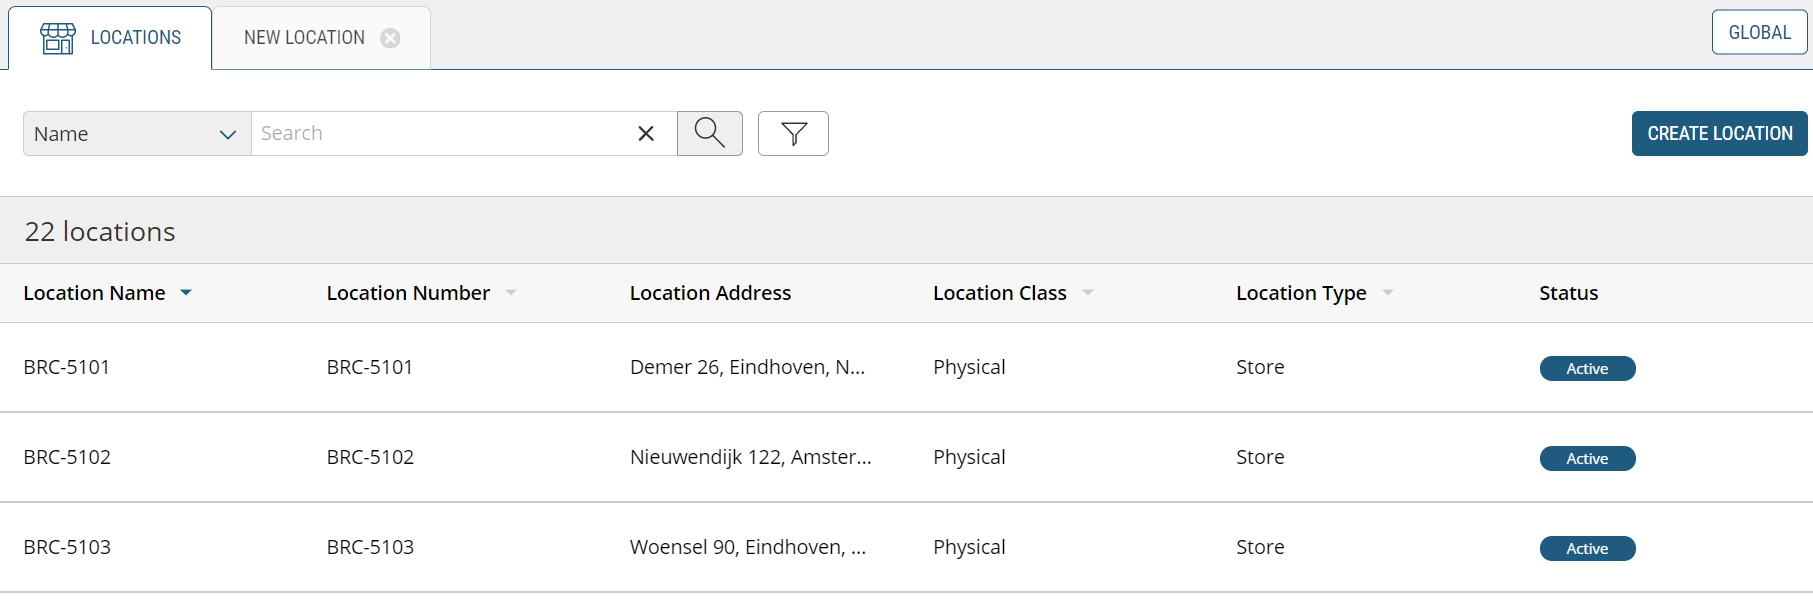
Figure 1 - Create location button
| 2. | Enter a Location Name. |
| 3. | Enter a Location Number. |
| 4. | Click Time Zone and select the appropriate time zone from the Time Zone drop-down menu. |
| 5. | Click Save. |
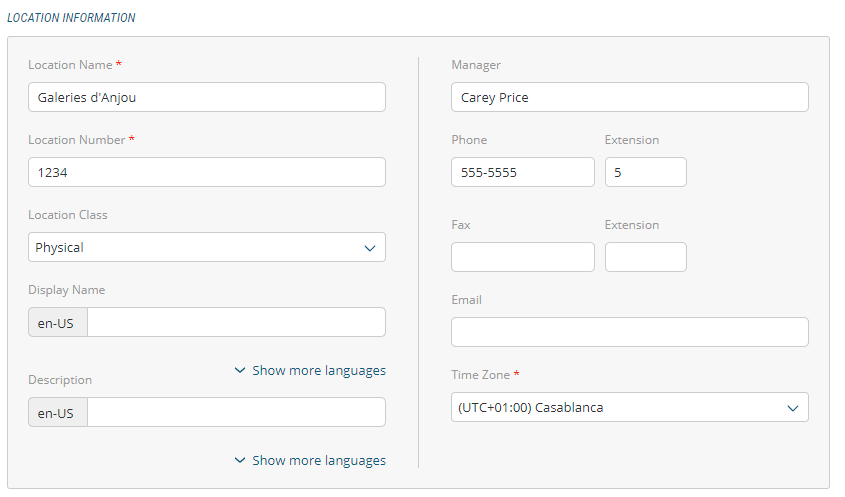
Figure 2 - Location Information dialog box
Important: When using a Shippo account as a routing provider and Canada Post is used as a carrier, you must enter a Store Manager name. Otherwise, a manifest will not be created in the Mobile Store Fulfillment.
The Information Dialog box contains other fields. Fill them out whenever additional information is available.
| 6. | Click Show more languages and select the appropriate language from the Display Name drop-down menu. |
| 7. | Click Show more languages and select the appropriate language from the Description drop-down menu. |
| 8. | The right half of the Location Information box contains fields for the Location Manager name, their phone and fax numbers, as well as their email address. |
Important: Location settings cannot be saved unless a Time Zone is set in this tab.
| 9. | Important: the store must be activated to be available. Set the toggle switch to select Active. |

Figure 3 - Location header - Active button
| 10. | Click Save. |
Managing Scope affiliation
A location must be associated to a scope configured in the commerce model. For warehouse entities only, you can assign multiple scope affiliations.
Scope Affiliation for Stores
You can assign only one scope when affiliating a scope to a location of type store.
| 1. | After a location of type Store has been created, click the Scope Affiliation tab. |
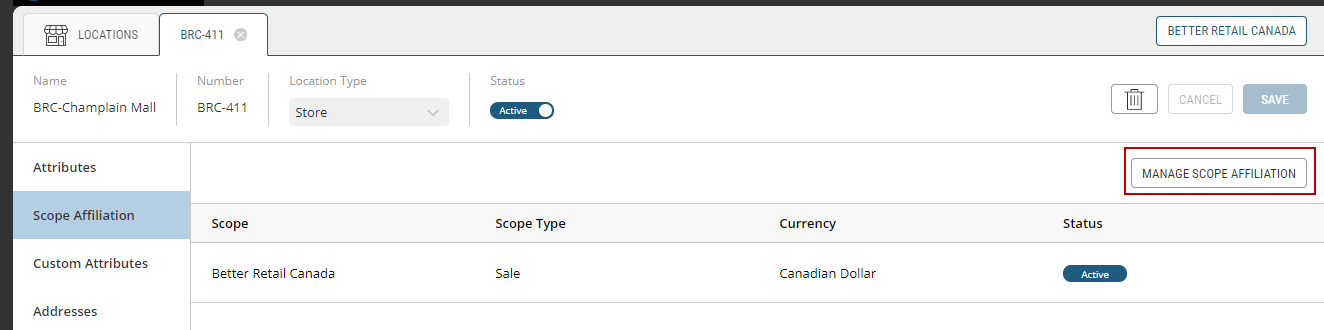
Figure 4 - Scope Affiliation tab
| 2. | Click Manage Scope Affiliation to expand the scope tree. |
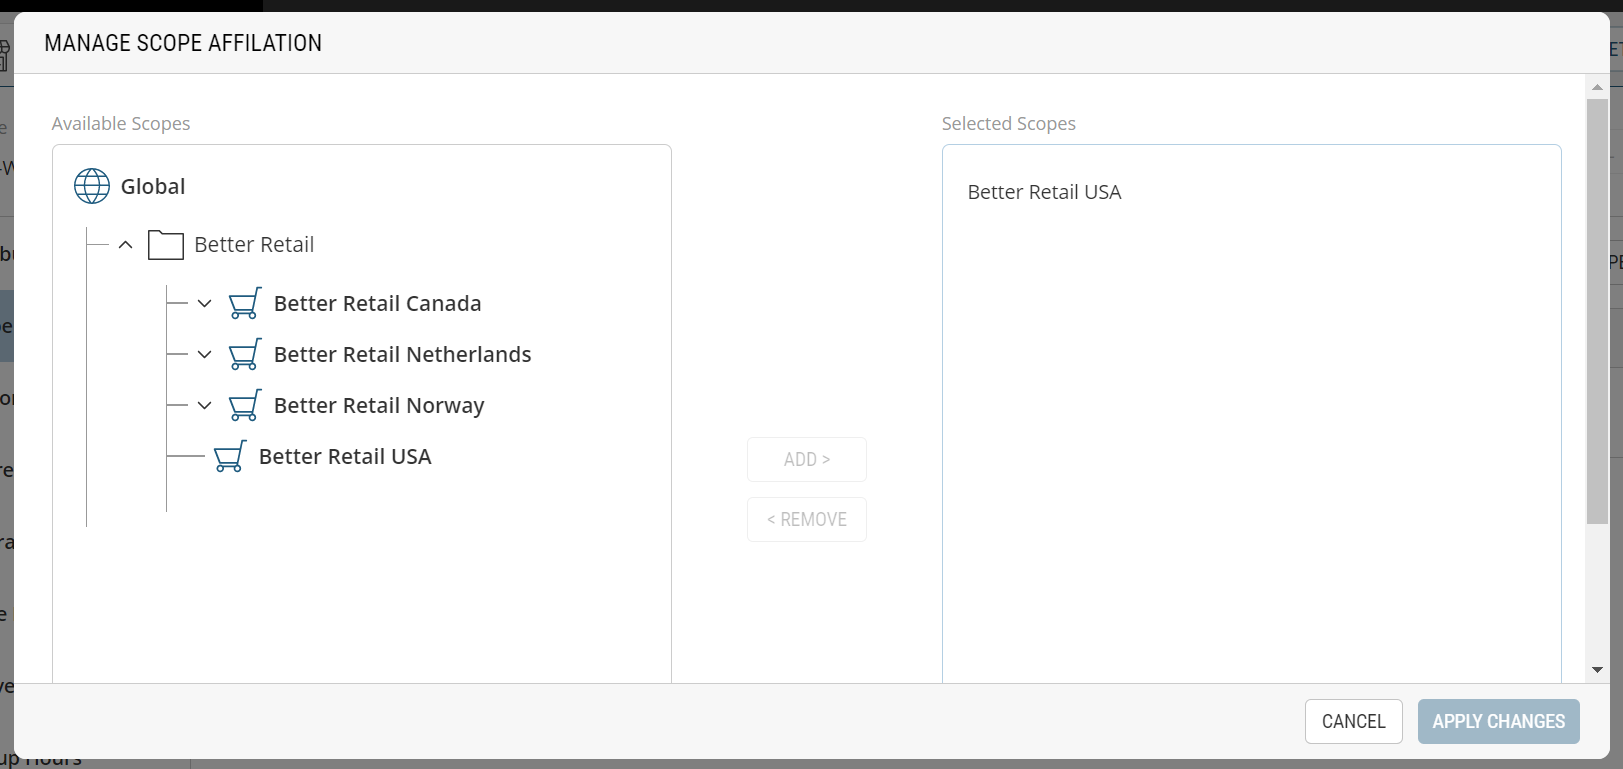
Figure 5 - Associating a scope to a location
| 3. | Click the appropriate scope. |
| 4. | Click Apply Changes. |
The scope is now associated to the location.
Scope Affiliation for Warehouses
A warehouse can support multiple locations across your business model. You can assign multiple scopes when affiliating a scope to a location of type warehouse,
| 1. | After a location of type Store has been created, click Scope Affiliation tab. |
| 2. | Click Manage Scope Affiliation to expand the scope tree. |
| 3. | Click the appropriate scopes (you can add multiple scopes for warehouse entities). |
| 4. | Click Apply Changes. |
The scope is now associated to the location.
Customizing Custom Attributes
Custom attributes can be added to a location so that specific settings can be implemented. By default, you will find a list of destination emails to define notifications so the proper audience can be made aware of events happening in this location. For example, you can add individual emails or a mailing list so that store managers are notified when shipment SLAs are about to expire.
Note: Individual email addresses and mailing list addresses must be separated by a semi-colon (;)
Other than Destination Emails, settings for the Mobile Store Fulfillment application can be configured such as defining the carrier account used for this location and if scanning items to fulfill the picking of a shipment is supported by the location.
| 1. | Click Custom Attributes tab. |
You can find multiple options among the possible attributes configured for your business model. For example, notifications can be configured in order to warn store managers of events that can occur in their stores. To set the destination emails:
| 2. | Enter the required emails in the destination fields. |
| 3. | Click Save to save your modifications. |
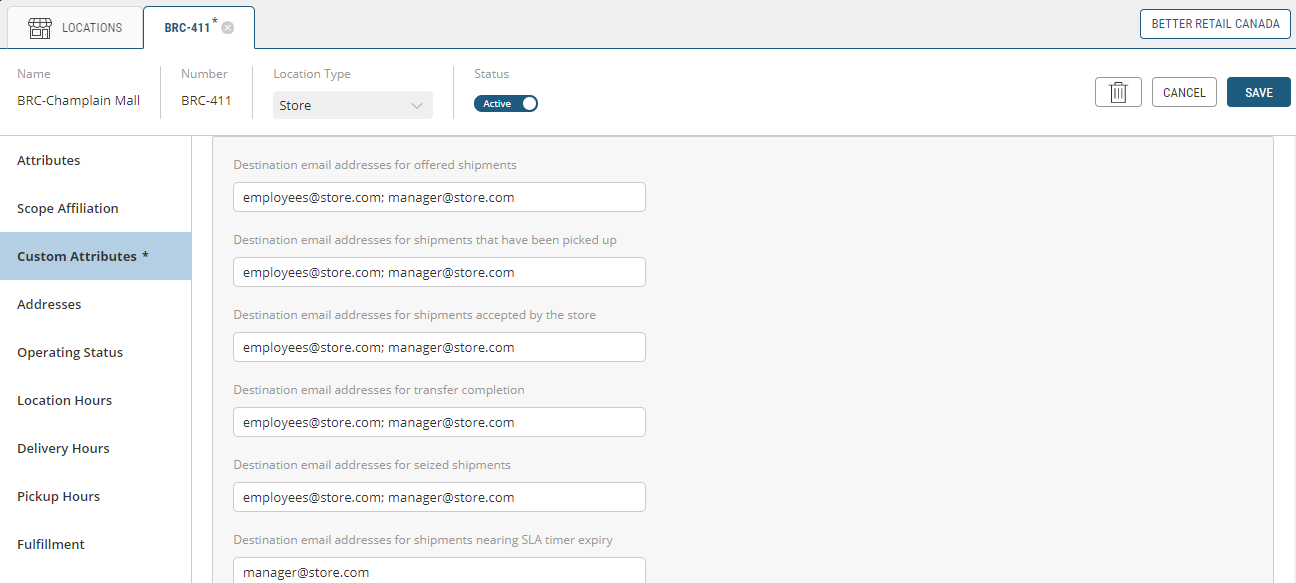
Figure 6 - Email Destination values
Customizing Fields in the Address tab
Use the Addresses tab to manage the addresses associated with the location. You can add, remove, and edit addresses in the location's address book using this tab.
| 1. | Click Addresses. |

| 2. | Click Add Address to bring up the Add Address dialog box. |
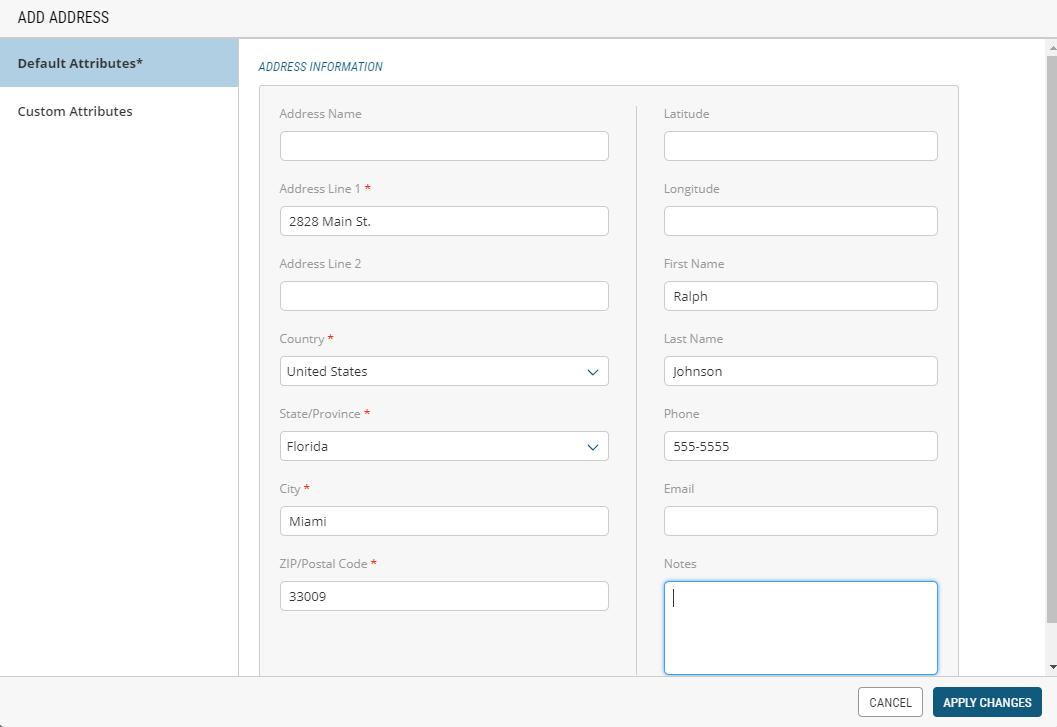
Figure 7 - Add Address dialog box
The Add Address dialog box contains both required and optional fields. Be sure to fill out as many optional fields as possible in order to obtain a precise location profile.
| 3. | Click Address Line 1 to add a civic address. |
| 4. | Select Country from the Country dropdown menu. |
| 5. | Select a State or Province from the State/Province dropdown menu. |
| 6. | Click City to add city. |
| 7. | Click ZIP/Postal Code to add zip code or postal code. |
| 8. | Click Apply Changes. |
Customizing Fields in the Operating Status tab
Use the Operating Status tab to override the standard statuses of a store (store status, delivery status, and pickup status).
The Operating Status is typically used for unforeseen exceptions to the regular schedule. For example, closure due to a fire or delays because of an accident.
| 1. | Click the Operating Status tab. |
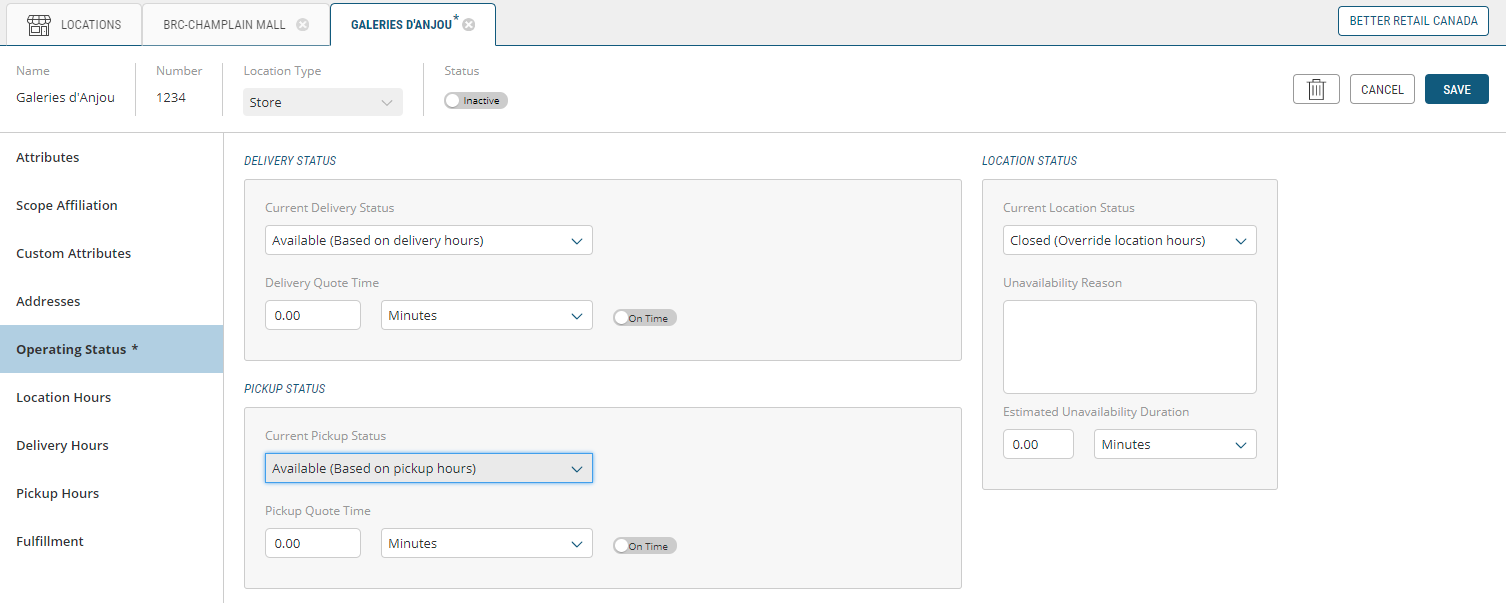
Figure 8 - Operating Status tab
Three sections will appear:
| • | Delivery Status dialog box (top-left) |
| • | Store Status dialog box (top-right) |
| • | Pickup Status dialog box (bottom-left) |
Delivery status
Use this section to customize the delivery status of a store.
Note: If your business model does not offer delivery, ignore this section.
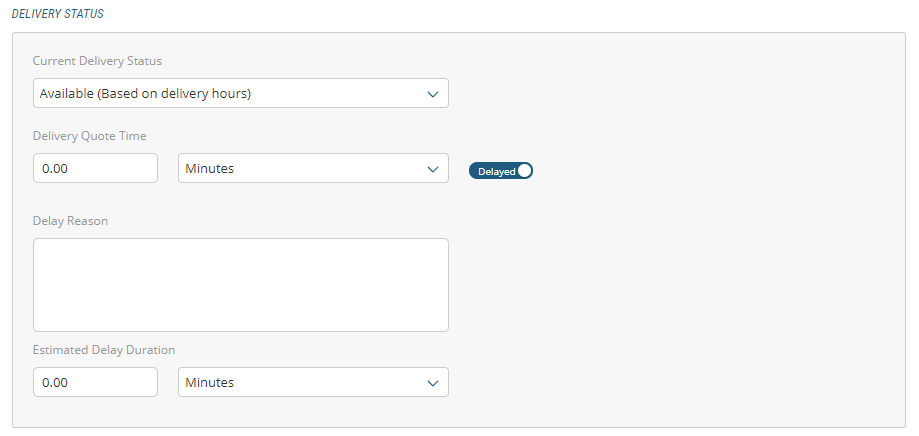
Figure 9 - Delivery Status dialog box
| 2. | Using the drop-down menu, select the Current Delivery Status of the Location. Available options are: |
| a. | Open - The store is operating according to the hours specified on the Store Hours tab (default). |
| b. | Closed - The store is closed. This setting overrides the opening hours specified in the Store Hours tab. When this option is selected, the Reason and Estimated Duration fields are displayed. |
| 3. | Enter the Reason explaining why the store is closed. |
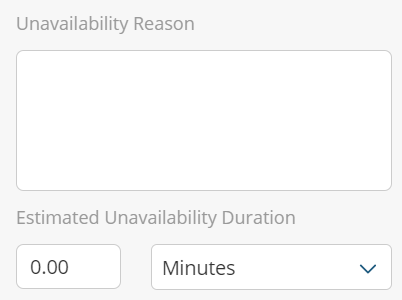
Figure 10 - Unavailability Reason dialog box
| 4. | Specify the length of time that the location is expected to remain closed. Enter a numerical value and select the time period in the drop-down (Minutes, Hours, or Days). |
| 5. | Click Current Pick-Up Status from the drop-down menu. The two options are: |
| • | Available - Pickups are available according to the hours specified in the Pickup Hours tab (default). |
| • | Unavailable - Pickups are not available. This setting overrides the hours specified in the Pickup Hours tab. |
Pickup Status
Use this section to customize the pickup status of the store. If your model does not offer delivery, ignore this section.
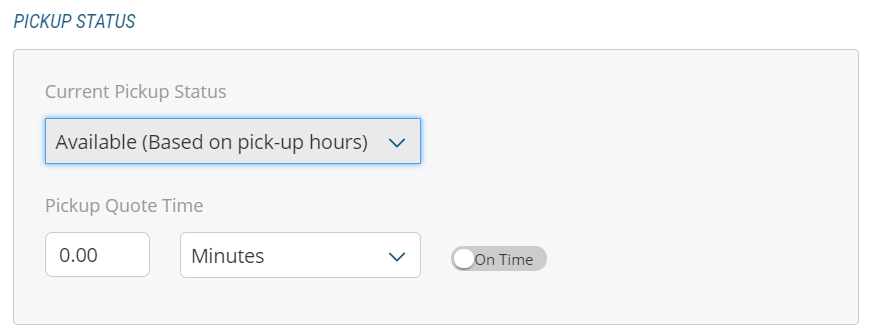
Figure 11 - Pickup Status dialog box
| 1. | An issue may impact the availability of the pickup service, therefore, when Unavailable has been set, the Pickup quote time is not displayed. |
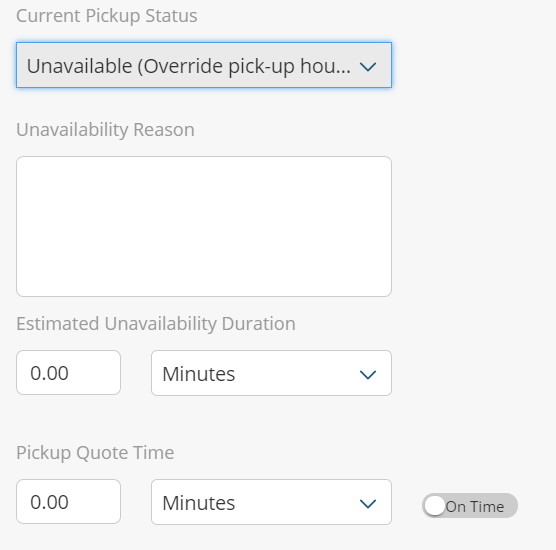
Figure 12 - Current Pickup Status dialog box
| 2. | In the Unavailability Reason box, specify the reason why pick-ups are not available. |
| 3. | Specify Estimated Unavailability Duration that pickups are unavailable by entering a numerical value and the drop-down menu to select the time period (Minutes, Hours, Days). |
| 4. | Specify Pickup Quote Time by entering a numerical value and the drop down menu to select the time period (Minutes, Hours, Days). |
| 5. | If Pick Up is delayed, set the toggle switch to indicate that (Delay Reason and Estimated Delay Duration fields are displayed when you select this option). |
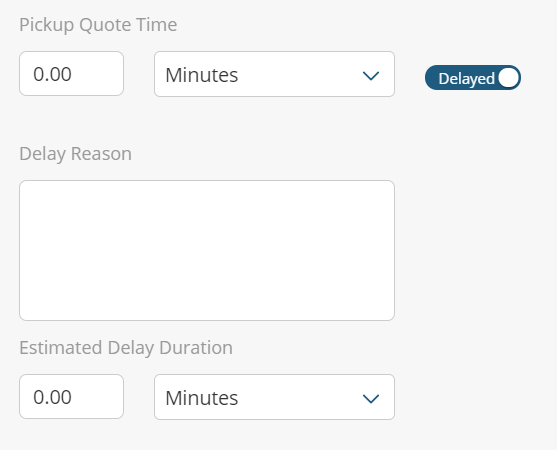
Figure 13 - Pickup Quote Time dialog box
| 6. | Specify Delay Reason. |
| 7. | Specify Estimated Delay Duration of the delay using the spin box to specify a numerical value and the drop-down to select the time period (Minutes, Hours, Days). |
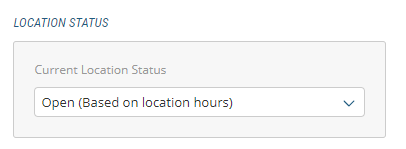
Location Status
Location Status overrides the store schedule availability. For example, if the store is closed because an emergency occurred, you can override the entire location operational status by using this option.
To override the store operational status, click the drop-down menu to select whether the location is currently open or closed. If closed, fill in Unavailability Reason and Unavailability Duration using the drop-down menu, select Open or Closed.
Customizing Fields in the LOCATION Hours tab
Click Location Hours to specify the opening and closing hours of a store as well as any dates or other times that the store will be closed.
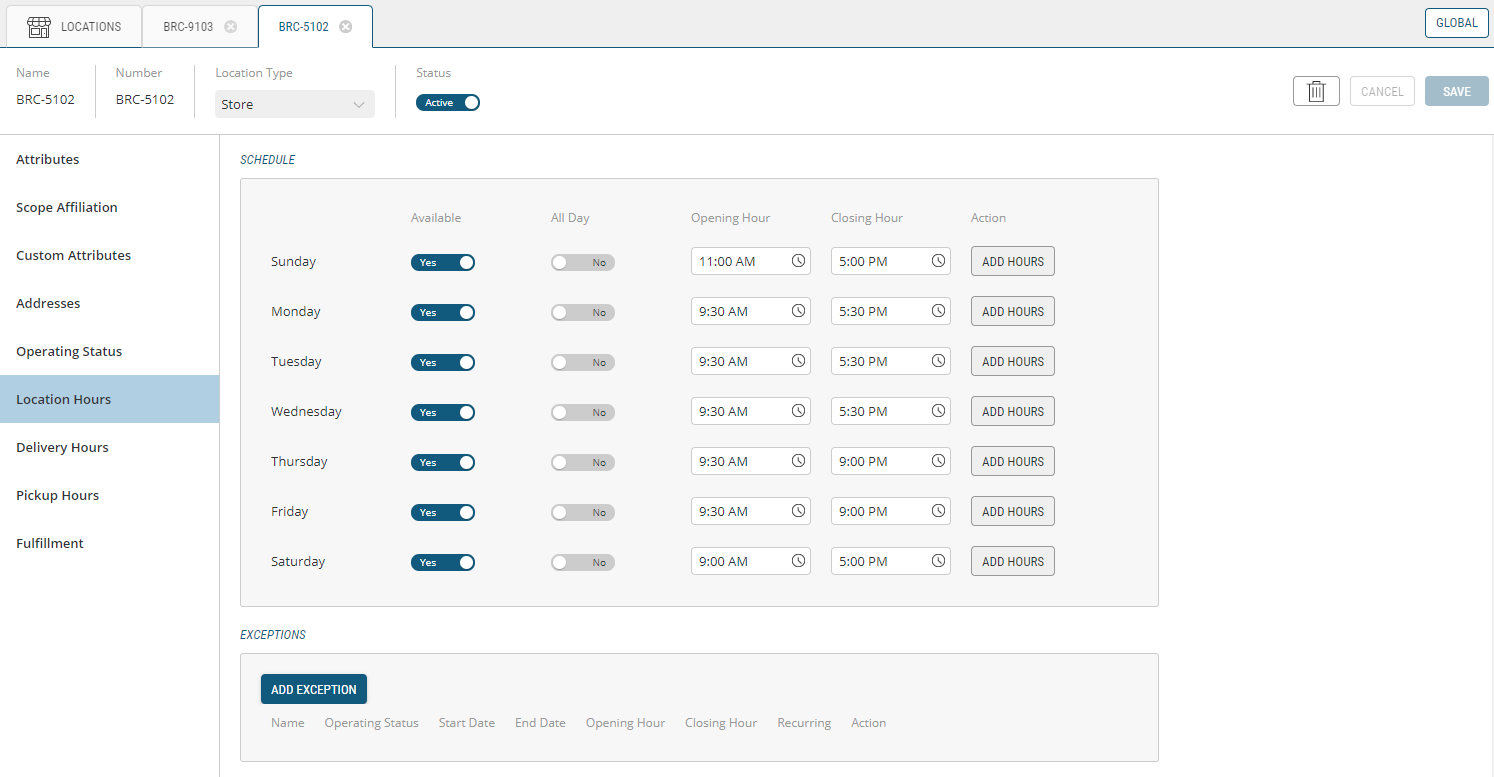
Figure 14 - Location Hours dialog box
By default, when creating a store, the All Day option is enabled, meaning that the store is open 24 hours. However, you can manually set store hours.
To manually set the general weekly hours of an active store:
| 1. | Clear All Day check toggle of the weekday that you want to change. |
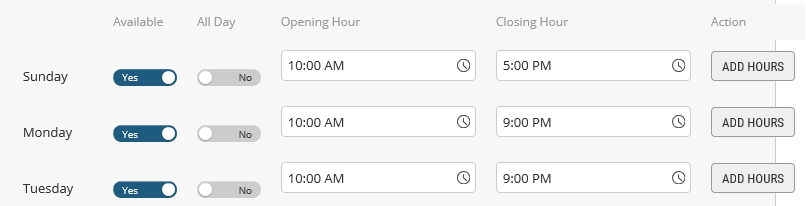
Figure 15 - Store Hours dialog box
A time span row appears with boxes in the Opening and Closing hour columns.
| 2. | In the Opening Hour combo box, click the Clock icon. |
| 3. | Select Opening time in the time picker. |
| 4. | In the Closing Hour combo box, click the Clock icon. |
| 5. | Select Closing time in the time picker. |
| 6. | If you want to add another Open / Close time span for the day, click Add Hours. |
Another time span row appears:
| 7. | Follow steps 3 to 6 to select another time span. |
| 8. | Follow Steps 2 to 8 for each day that you want to change. |
Adding exceptions
Exceptions are particularly useful to plan days when a store is exceptionally closed.
For example, if a store is closes the afternoon of Christmas Eve, you can change the operating hours to Closed from 12:00PM to 9:00AM.
If the store is open but with modified hours, such as on Black Friday or Boxing Day:
| 1. | Click Add Exception. |
| 2. | In the Name field, enter the Name that identifies the exception, Boxing Day, for example. |
| 3. | Set the operating status toggle to Opened. |
| 4. | Click the Start Date calendar button to make a date selection. |
| 5. | Click the End Date calendar button to make a date selection. |
| 6. | Click the Opening Hour button to select the opening hour. |
| 7. | Click the Closing Hour button to select the closing hour. |

Figure 16 - Store Hours Exceptions dialog box
Adding an exception that is an annual recurring event:
| 1. | Check Recurring box to repeat the exception. |
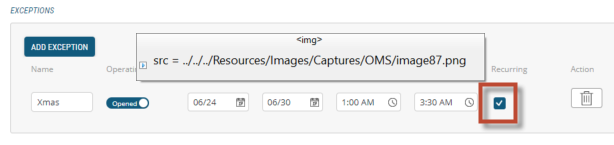
Figure 17 - Recurring Exception check box
Deleting an exception
Check the Trash icon to delete the exception.
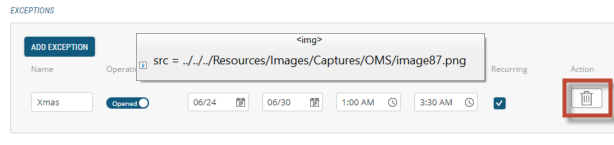
Figure 18 - Delete Exception button
Customizing Fields in the Pick-Up Hours tab
This tab allows you to set the Location pickup hours and add exceptions to the Location operation hours. You an also enable timeslots so that customers can pick up their orders during a specific time frame. This is a key indicator that fulfillment must occur before the pickup time.
If the location is virtual, the following steps do not apply as the Pick-Up Hours tab is inactive and cannot be modified.
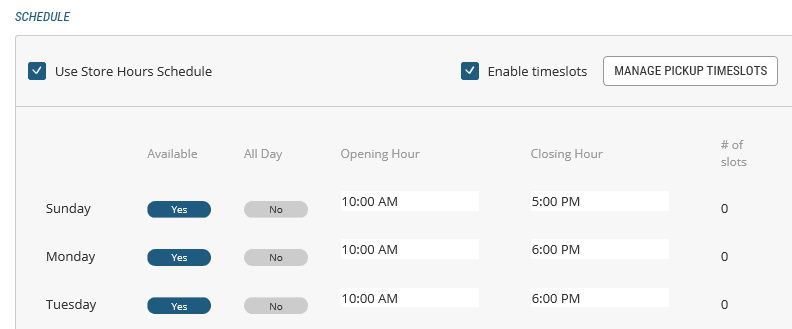
Figure 19 - Customizing Pickup Hours dialog box
| 1. | Click Pickup Hours tab in the navigation tab. |
| 2. | Click Use Store Hours box (top-right). |
| 3. | Click Enable Timeslots box (top-right). |
| 4. | Click Manage Timeslots box (top-right), the schedule can now be modified. |
Select day or days of the week and use the sliders to indicate whether a location is currently available.
| 5. | Deselect the All Day check box for the weekday that you want to change. |
Refer to the time span rows that appear with the Opening and Closing Hour columns.
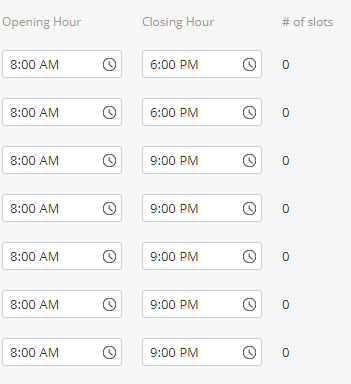
Figure 20 - Opening / Closing Hours Time Span rows
| 6. | Click Opening Hour box and specify when the Location is expected open. Use the Date and Time picker to select hours, minutes and AM/PM). |
| 7. | Click Closing Hour box and specify when the Location is expected close. Use the Date and Time picker to select hours, minutes and AM/PM). |
| 8. | Repeat for other days of the week, if necessary, then click Save. |
Managing Timeslots and Quotas
When Enable Timeslots is checked, you can specify timeslots and assign a quota for each of them. This can be updated on a weekly basis.
For more information on timeslots and quotas, see Timeslot and Quota Management
Exception handling
Example: the delivery person not available on weekends but pickup in store can still occur.
To add exceptions to regular Location hours:
| 1. | Select the Location Hours tab. |
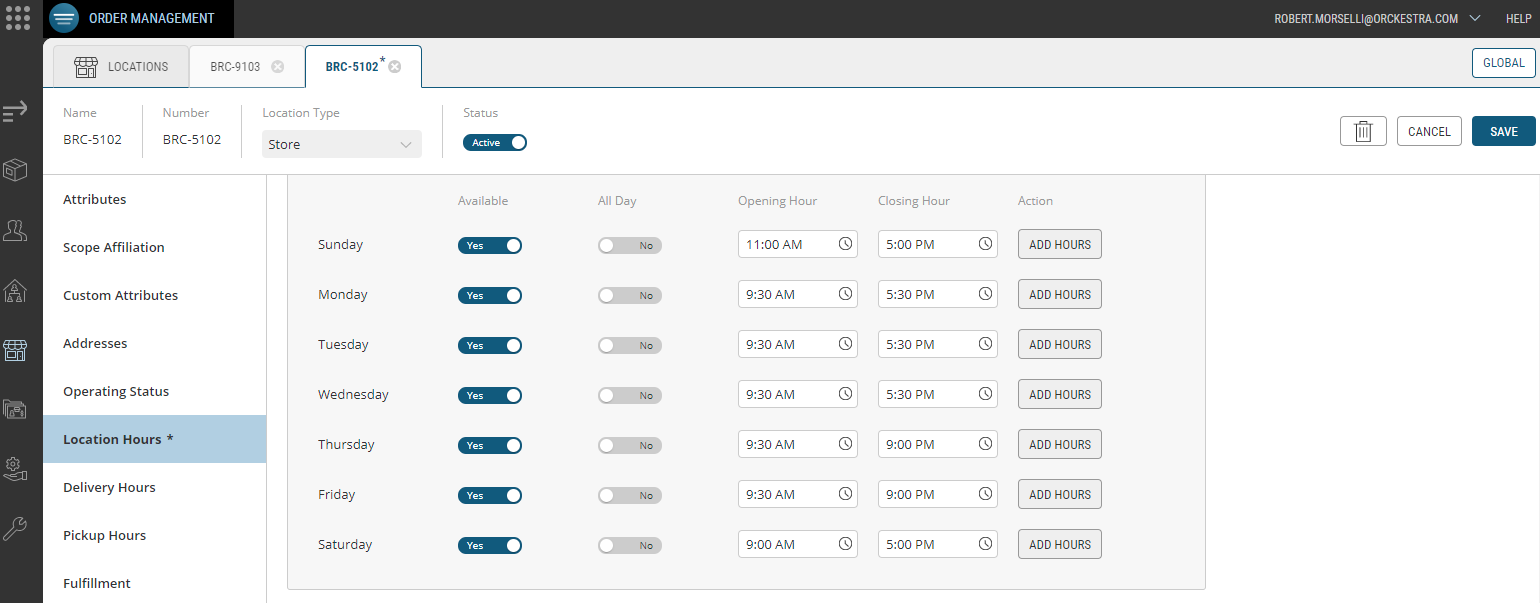
Figure 21 - Location Hours tab
The Location Schedule appears with predetermined Opening and Closing Hours (see right-hand columns).
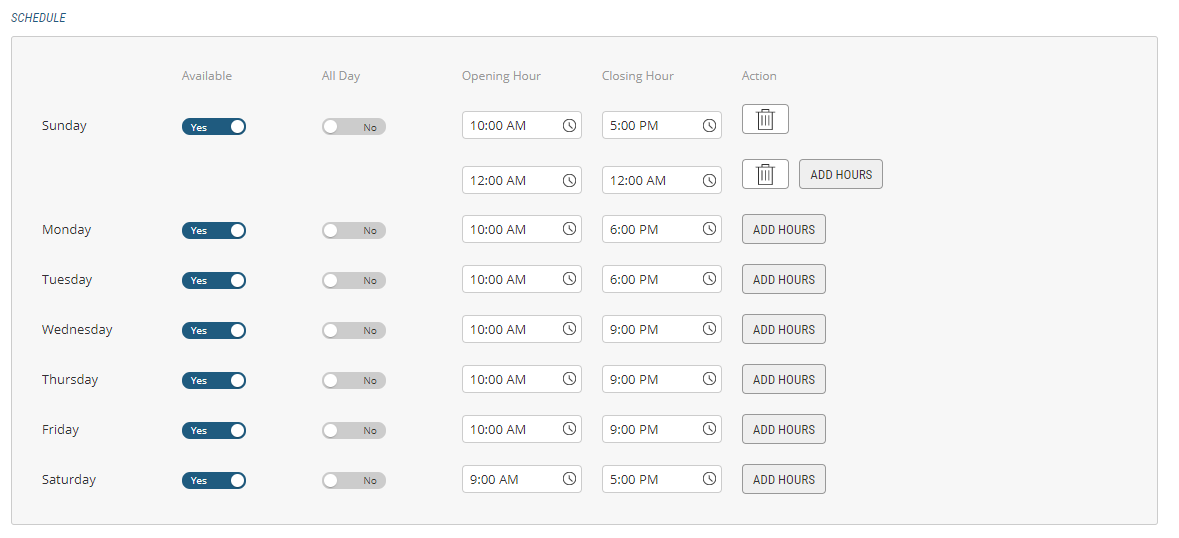
Figure 22 - Location Schedule Opening / Closing hours
Customizing Fulfillment options
Inventory Management
These options were created to give you the flexibility to meet your inventory-management needs. Whether your fulfillment locations manage their inventory based on available quantities or scheduled periods of availability, you can use the settings below to determine how much you want Orckestra Commerce Cloud to manage for them. From simply allowing orders to be placed with no inventory information at all to calculating item reservations and availability to promise.
There are 2 types of inventory settings for a location:
| • | Quantitative status: refers to the number of units of a product available for sale |
| • | Scheduled status: refers to inventory for a given product that may or may not be available. You can use this to set the inventory status for products at individual inventory locations if it isn't necessary to track specific item quantities, such as online grocery products |
This information is often sent to Orckestra Commerce Cloud from your internal inventory system at a specified frequency.
| 1. | Enable Show the inventory status of products at this fulfillment location if the inventory status of line items at this location must be visible. |
| 2. | Enable Evaluate reservations and availability to promise if reservations and availability to promise will be calculated. |
When the two settings above are enabled, the information being sent to the platform is frequently updated and, therefore, accurate. Orckestra Commerce Cloud drives the orders being captured and can accurately track availability to promise without needing frequent synchronizations.
Inversely, when disabled, if you do not manage inventory with the Orchestration Console, there is no feed sending inventory information to the Orchestration Console, thereby providing unreliable information to your CSRs and customers.
The Inventory Management box contains two mandatory fields (identified with red asterisks).
| 3. | Select one of two options from the drop-down menu: |
| a. | Scheduled Inventory Provider or, |
| b. | Quantitative Inventory Provider |
| 4. | Enter an Inventory Reference Number. |
| 5. | Click Save. |
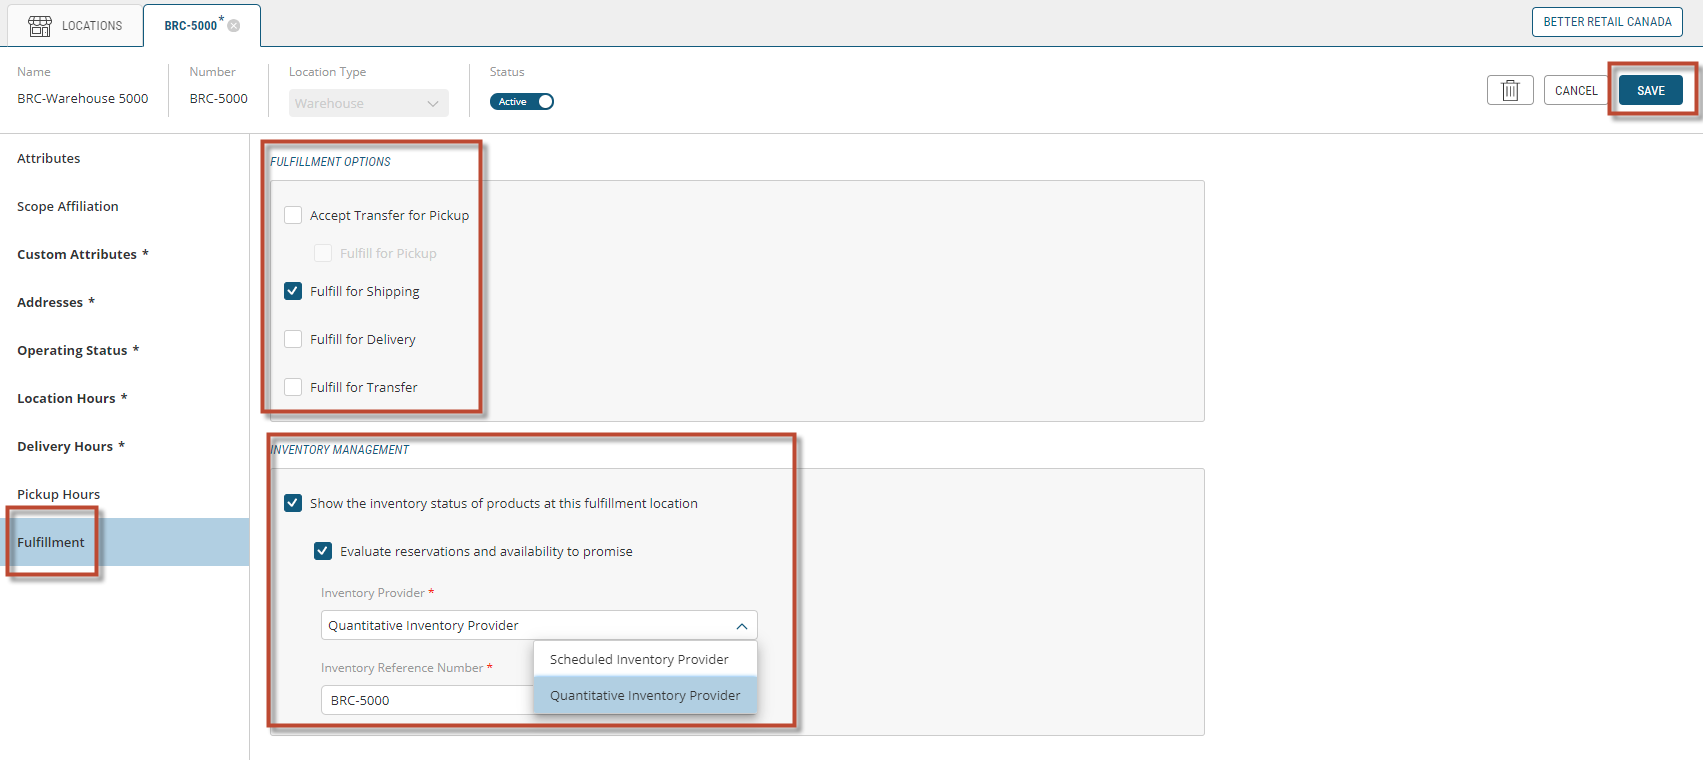
Figure 23 - Fulfillment Options, Locations
REFERENCES
| • | Modifying Locations |
| • | Deleting Locations |