Adding Media to a base product and variants
PRODUCT MANAGEMENT > PRODUCTS
A variety of media can be add to products and their variants. To view the list of accepted file types, see Accepted files in Media Management
When a file is added to a base product or a variant, the file is duplicated and resized in 3 other resolutions.
Important: the original file should have a resolution of at least 1500px by 1500px.
|
•
|
Original Image Size (XL) This is the largest resolution displayed when a user zooms in on the product details page. |
|
•
|
Product Details Image Size (L) This is the image displayed on a product details page. |
|
•
|
Product Listing Image Size (M). This is the image displayed when products are shown as tiles in a search query or when browsing a category. |
|
•
|
Thumbnail Image Size (S). This is the image displayed under the main image in a product details page. |
|
1.
|
Click a product in the catalog. |
Media files are displayed.
Warning: Variant media files will not be displayed in this tab, they will only be displayed in the Media section of the Variants tab.
Adding media
You can add media by browsing your computer and selecting a file or specifying a URL (like a Youtube video).
Tip: Variant images are managed at the Variants tab level.
|
1.
|
Click Add Media under the base product or variant. |
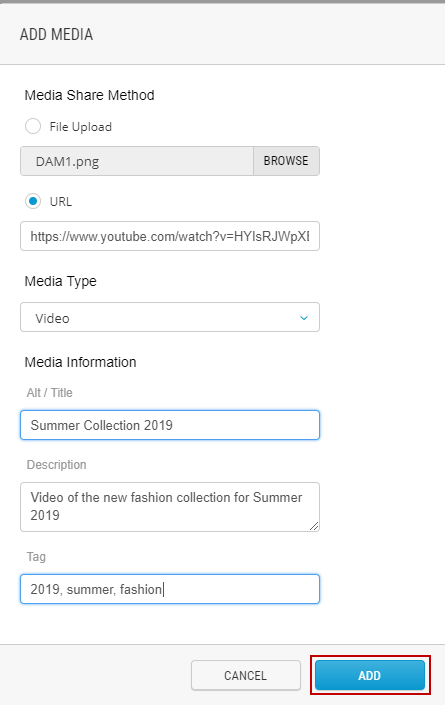
Figure 1 - Uploading files
|
2.
|
Under Media Share Method, indicate how you will be adding the file: |
|
a.
|
File Upload: Click Browse, select the file on your computer, then click Open. The Media Type is automatically selected. |
|
b.
|
URL: Enter the URL and select the Media Type, as needed. |
Important: when using the URL option, ensure your image file name follows the naming convention configured in Media Configuration.For more information, see Managing Media Configuration. When using the File Upload option, your file name is converted automatically.
|
3.
|
Enter Alt / Title information. |
|
5.
|
Enter at least one tag. |
Tags must be separated by commas.
|
7.
|
Publish the product following your internal workflow. |
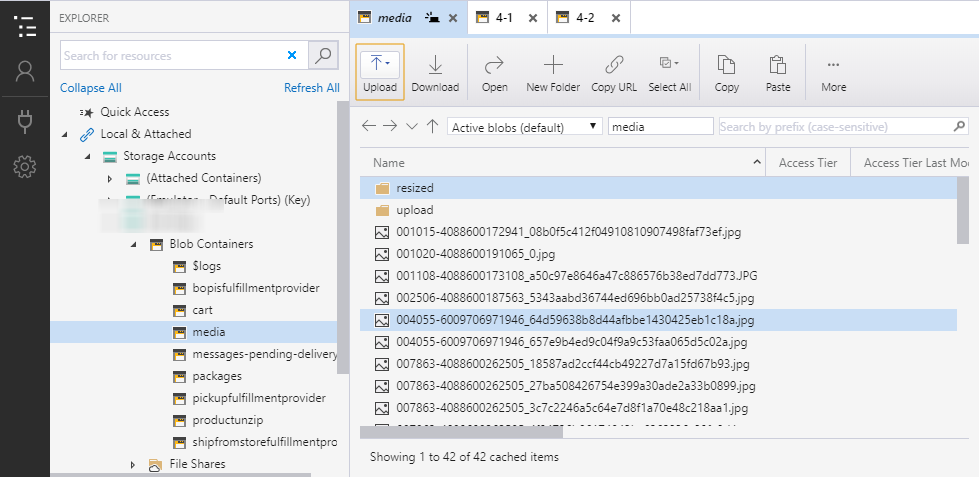
Adding media using the blob storage
You can upload multiple files to the BLOB storage using a tool such as Microsoft Azure Storage Explorer. To configure this tool, you must use the associated URL and key provided by Orckestra.
Important: when uploading an image, your media file must use the following naming convention (ProductID)_0.jpg as a file name. For example, if the product ID is 001020-4088600191065, the product file name must be 001020-4088600191065_0.jpg. If the product has more than 1 image, the sequence number (0) in the file name will increment. In the above example, the second image file name would be 001020-4088600191065_1.jpg.
|
1.
|
Click Microsoft Azure Media Storage. |
|
2.
|
Connect to the BLOB storage. |
|
3.
|
Drag your files to the Media folder. |
|
4.
|
Files will be automatically associated to your product and resized to other formats so that they can be properly displayed in the different areas of the website (product detail page, full size, thumbnail and category pages). |
REFERENCES